💥 1941 Global Command Decision - Official Thread
-
@thedog
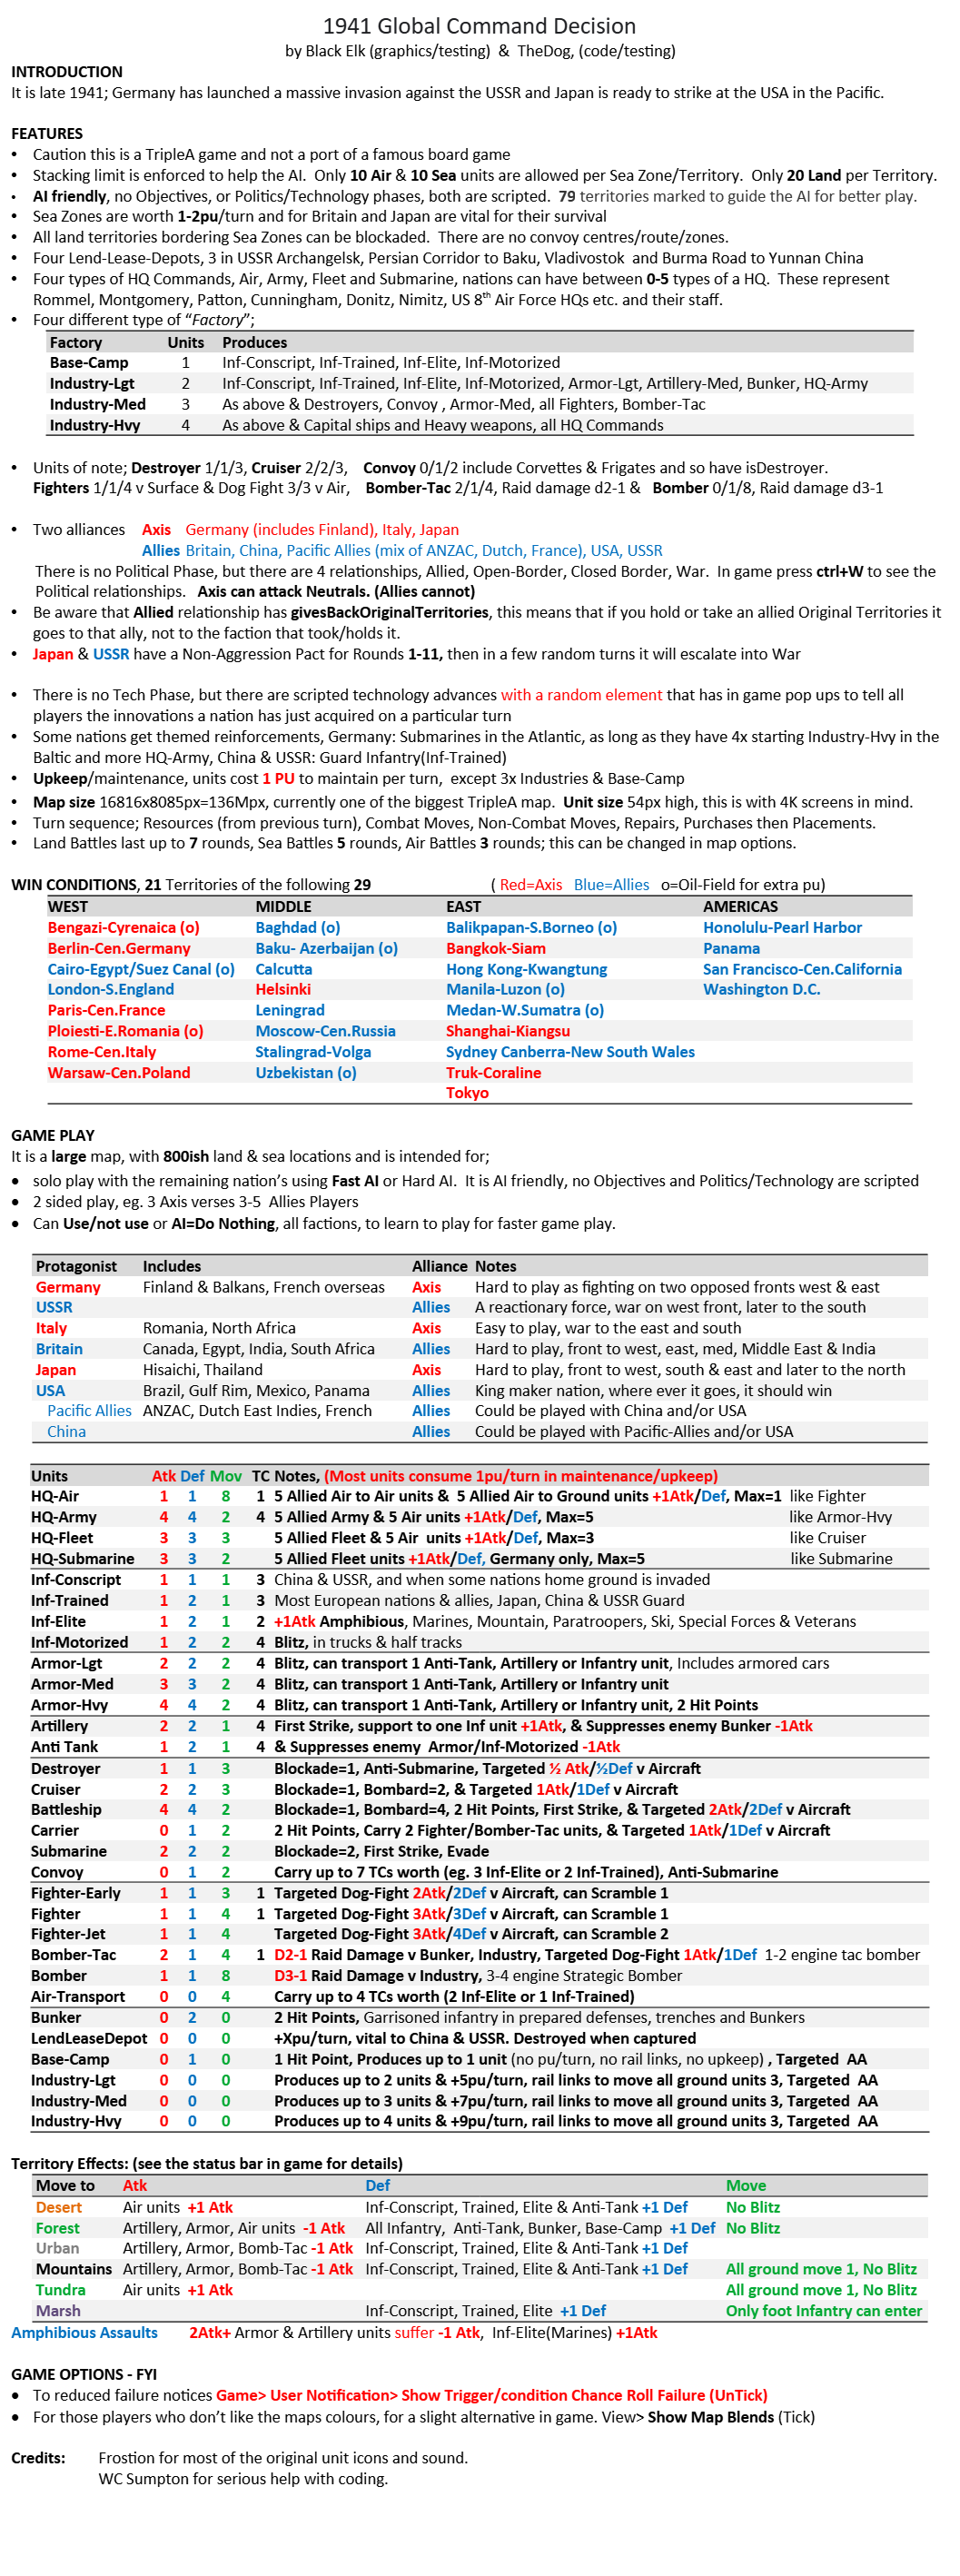
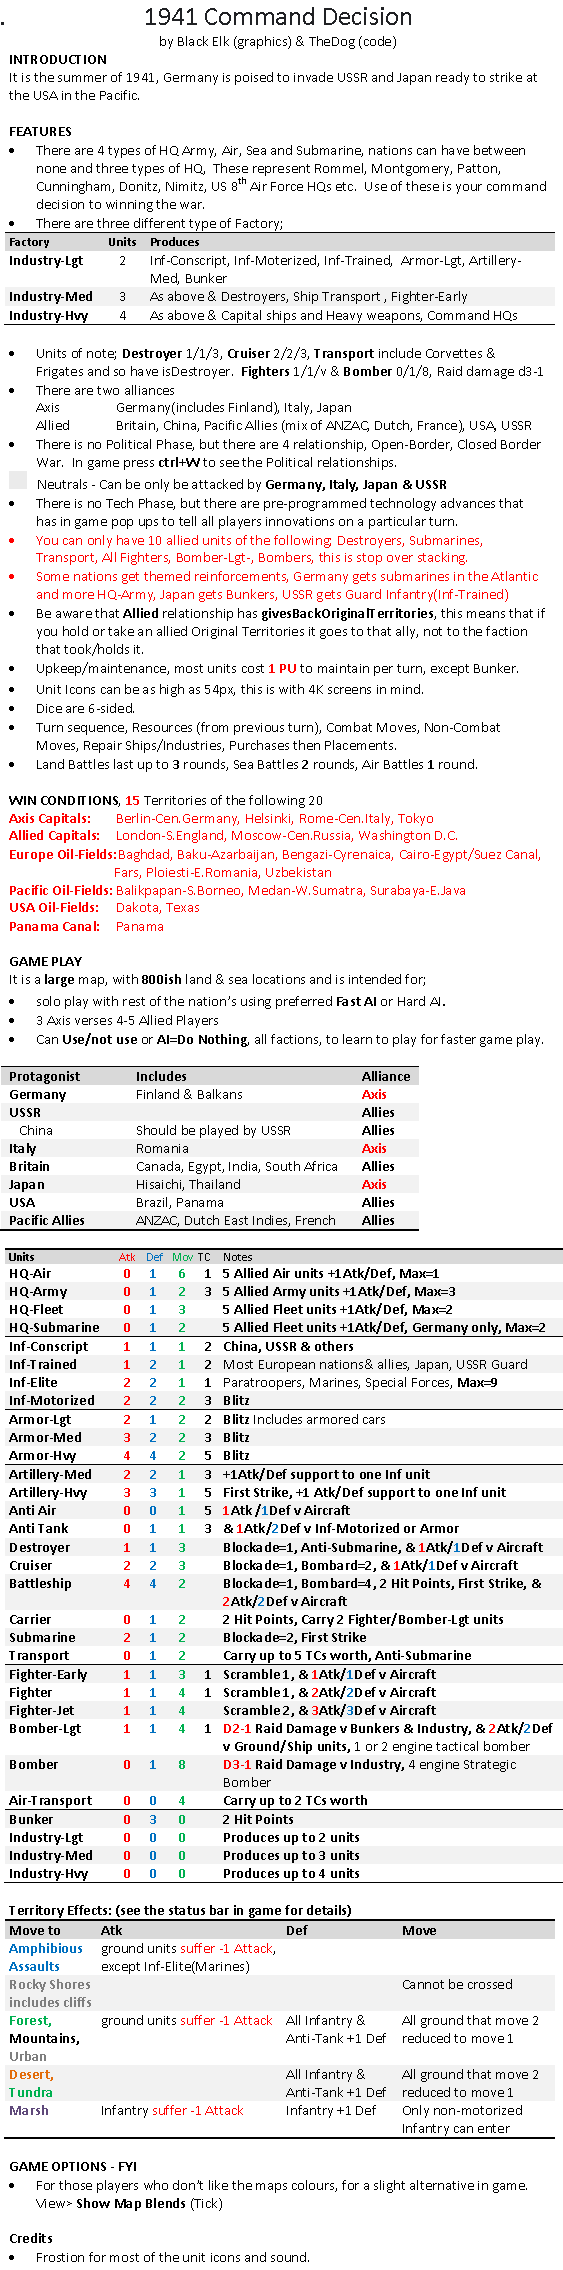
Here is the latest Game Notes below.The main differences with the last one is (see red)
- An attempt at reducing stacking of certain units
- Themed reinforcements
- Win conditions comprising Capitals, Oil Fields & Canals. (getting close to a beta release)
.
-
This map has lots of non standard ww2 units.
The most important units are the combat commands, your decision where they are used can turn a battle in your favour as they add +1 attack to five units. Britain, Italy, Japan & USA have;
HQ-Army x3
HQ-Fleet x2
HQ-Air x1
However Germany has lots of HQ-Army and replaces HQ-Fleet for HQ-Submarine. USSR only has HQ-Army x3.Transport has isDestroyer so is capable of defending against submarines
Destroyer is 1/1/3, moves faster than a submarine
Cruiser is 2/2/3, is hopefully viable as a unit compared to Destroyer
Most Ships have an extra AA attackFighters base stat is 1/1/3 or 1/1/4 against all units but has an AA attack - use them for Air Superiority not ground attack.
.
Super Stacks
Currently to reduce super stacks and help the AI, it makes use of limiting unit Stacks. The following are limited to 10 units per territory per unit type;- Destroyers
- Submarines(includes Submarine, Submarine-Adv)
- Transport
- All Fighter(includes Fighter-Early, Fighter, Fighter-Jet, P51-Mustang)
- Bomber-Lgt (1 & 2 engined tactical support)
- Bomber (4 engined strategic bomber only used by Britain & USA)
There is also another Stacking layer of 20 units per territory per type for;
- All Air (a maximum of 20 air units)
- All Sea (a maximum of 20 sea units)
Search the XML for "Go Stacks"
.
AI help & Victory Conditions
Use of "Capital" code to guide the AI.
The map has 20 Capital territories, these include;
7 Nation Capitals
11 Major Oil Fields
2 Canals - Panama and Suez Canals
The German attack in Russia does focus on Southern Russia, the Japanese attacks on Sumatra and Java do sometimes get distracted by mainland China. -
It is currently in Beta and needs testing, please note
- Use 2.5 as 2.6 crashes with "An unexpected error occurred!"
- Use Fast AI for faster gameplay or Hard AI for more considered game play
- Territory connections - need checking
- Territory terrain forests etc - need checking
- Balance - needs play testing
- Territory names & PU to be removed in the final version and are displayed for testing
See post 1 for download link and more details
https://forums.triplea-game.org/topic/3326/1941-global-command-decision-official-threadYour comments would be most welcome.
-
Download 1st version.
It is currently in Beta and needs testing, please note
- Use 2.5 as 2.6 crashes with "An unexpected error occurred!"
- Use Fast AI for faster gameplay or Hard AI for more considered game play
- Territory connections - need checking
- Territory terrain forests etc - need checking
- Balance - needs play testing
- Territory names & PU to be removed in the final version and are displayed for testing
See post 1 for download link and more details
https://forums.triplea-game.org/topic/3326/1941-global-command-decisionYour comments would be most welcome.
-
Looking good! I launched it in 2.6 and threw off the error cause I got excited and didn't read lol. I'll redownload the stable to have a better look when I get a chance, but caught the quick glance. It's always fun to see a map come to life hehe
Nice work dude!
-
Are you playing just one player and everything else AI or all allied or axis players against AI ?
-
@beelee
Testing has been all players as Fast AI or me as a single nation v Fast AI. -
@thedog right arm
 I'll try and give it a go in a week or so. Looks like a lot of cool stuff to explore
-
Ok so had a few hours earlier and played around a bit. Or I suppose I wouldn't call it playing per se, just kinda messing around with the UI mostly. I set all players to human, ( the default is AI, which threw me on the first launch hehe) just to see if I could figure out what was going on from the perspective of a pretty green player who mainly just plays A&A.
Step one was to check the notes, obviously, though I'll admit I had some difficulty with the font there. So I thought I'd just start with that haha.
To me it looks like the documentation font is computer pixel-7 or lazenby maybe? I can decipher the characters sure, but not without some effort and a bit of strain on the eyes lol. To me this font choice evokes computers and WarGames for sure (the1983 movie I mean, which I definitely enjoy, of course!) but to me that font is also properly green txt on a black screen background, like I'm booting DOS in the time warp hehe. When I see it black txt on plain white, I don't know, just doesn't hum the same way and doesn't quite carry for a WW2 theme.
For WW2 era compatible fonts my fav is probably Daily News Gothic for something general that looks it was ripped from the headlines in the 1940s. But I'm American, so that might color my preference lol. Like I can only go so gothic with it though.
Certainly the more stylized German typefaces of the period remain largely illegible for me, so anything too Fraktur would have to be like very sparingly used. Maybe for a title or a couple word phrase I could see it, but Daily News Gothic is just works a lot better I think, for something general like notes. Basically it looks like this...
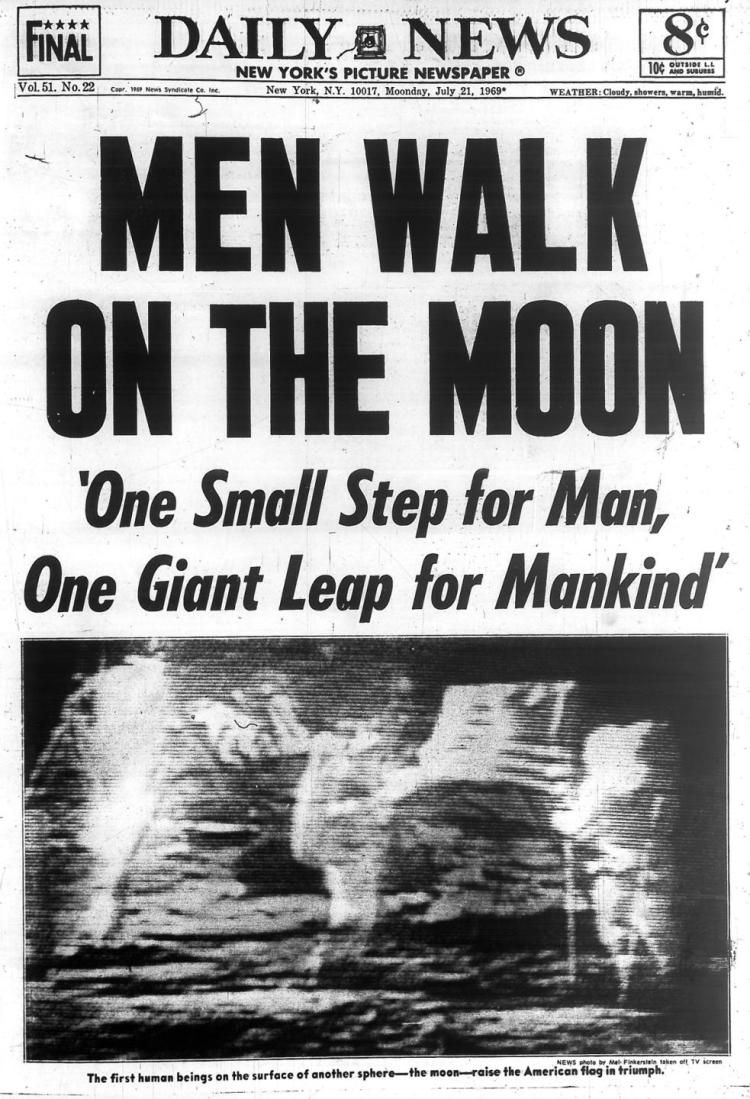
Timeless, even into the late 60s! haha
Gill Sans or Windsor Elongated is alright too, for like an international bulletin or trans Atlantic cable type look, but not as good as Daily News Gothic for me. It's still easy to read, like Times New Roman, but whereas Time New Roman is too ubiquitous to really have a distinct vibe, Daily News Gothic still carries that sort of nostalgic news print or pulp headline sort of hauntological appeal, at least for meheheh.
I also like Kaufmann, for something more cursive, like a propaganda poster. Or maybe something like Futura Black or Basalt could be cool in some instances, but again those are kind like the Fraktur I think. Better used sparingly, short phrases or titles, for more decorative type text.
Anyhow, that was my initial thought. Just obsessing about fonts lol.
Then I figured out how to turn map details on (it's set to off by default) and just kinda gloried in how cool it is to see the map. So massive!!!
For the first impression in terms of G1, I didn't really understand what was going on with the initial phase, but figured it was probably to do with the uboats. Once I got into the combat move phase, things felt a bit more familiar. I didn't notice any kinks for the opening movements. Except that I found the distribution of starting forces hard to parse on the eastern front. It probably makes the AI faster to have all the stuff on the border TTs, but as a human player I think moving forces into position from the interior might help. Also for the first turn, it might be nice to have the players do some kind of purchase placement round or something that leads into round one proper, so they can get their bearings and also to provide a randomizer. Starting with a board that's more blank, with the player building out their positions, may help the player to feel less overwhelmed by the sheer number of units in play or to navigate the many territories and sz tiles on display.
For the combat phase proper, I had some difficulty parsing what was happening in terms of the unit interactions, just from going into it cold from A&A. Stuff is clarified somewhat in the unit help screen, but it might be helpful to suss that out in the main notes too, so players can orient themselves to stuff like how tanks will work and whatnot. Initial impression was just that I didn't really know how the units were pairing off against each other with the new features, so when the hits would roll it, was just sort of a blur, like hope for the best and see what happens lol.
Doubtless that impression will recede a bit as I come to understand the underlying dynamics more, but out the gate I'd say just having a basic familiarity with say v3 or v5, would be insufficient to dive right in on this one. Like there's just a lot of novel stuff going on. So the player would have to kinda prep and learn what's going on first I'd guess. For me whenever I play a new tripleA game, things tend to be a mystery until the purchase screen displays and I can see all the stuff side by side for the quick comparison. So it's almost like, in any A&A style game you really have to play through round 1 several times before the start position can click, and only then can start to puzzle out what to do with what's given at the outset. So still at the part over here. I'm trying to think of ways where the set up could sort of handhold the player, for stuff that's particularly different, but it took me till the end of the gameround to start getting my head around it. But then I just restarted and assigned control to the HardAI for everyone to see what would crack off. That's sorta where I'm at right now
Anyhow, fun stuff! It's cool just to see it breathe!
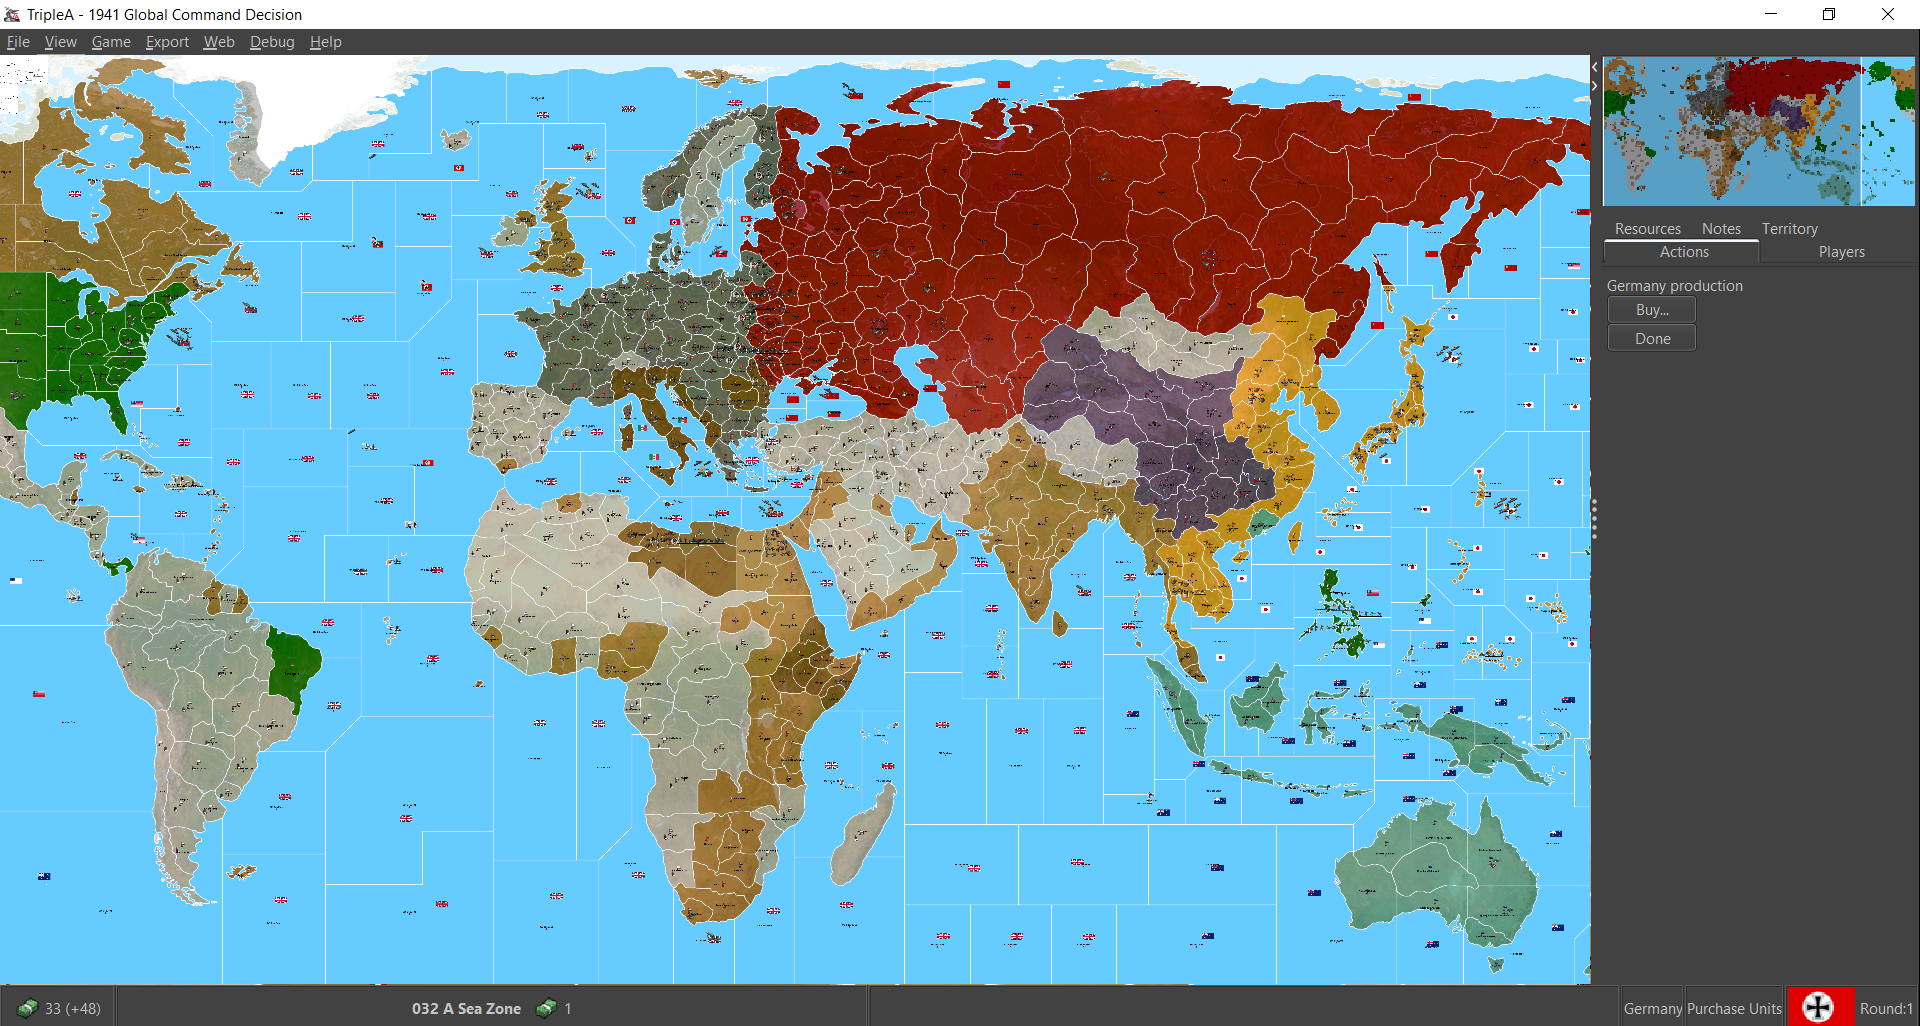
Not too shabby! Even doing the fit width thing for the map view, I could still make out the borders from the fuzz down to 9% so that's good! Like at least the sz lines didn't completely disappear at max zoom out, like sometimes happens with the standard world war II maps. Sweet!
Again, great work! I'll hop back in this week when I grab another night free. Catch ya in a few dude!
-
ps. Oh also, just thinking about ways to tutorialize that first round of gameplay, or perhaps to do a set up type round... Even though tripleA is pretty limited, cause we can't really do like a tutorial campaign mini-game or things you might see in other grand strategy fair, I thought an idea that might be interesting would be to use the round prompts like a tutor. So like instead of doing it all historical/thematic like in say Iron War, it might be done with a more nuts and bolts approach. Sorta like, "this is how this game is played" with stage set more like that. Instead of a little reel that says "Germany 1941" with a timeline spiel or whatever, it could be like "Germany: Round 1 Tutorial" with a little clip highlighting what's going on in the exact moment, like right there in the current phase where the player's at, to clue them in. And it could perhaps go like that for the entire first round, with the gameplay proper actually starting in round 2, when you'd get the Historical intro themed stuff to highlight the overarching narrative Dec 1941 or whatever. Perhaps it could skip past once you've done it, purely optional but geared towards a first outing? Or maybe just ding a zero round type thing where all nations make a buy first and get a quick primer with a unique opener round would work?
Done that way an initial purchase round, or a simplified movement/combat phase in a zero round, we could prime the player and get them invested in what's happening, but kinda staggered and deliberate. Sorta easing it in with that clear first step. The overall gameplay would be more variable that way, with variable unit starts, but that might not be a bad thing. To familiarize the player with stuff like unit caps, and just the placement mechanics, like how factories work it could be cool to have that come before the combat phase minutia. Purchase/Combat or Combat/Purchase, either way the player is going to be in the dark on one aspect while engaging with the other, and I do like Combat/Purchase more overall. But if done with a zero round type thing first-purchase or pre-purchase, where afterwards it goes to regular combat/purchase would probably do the trick. Basically building the bid into the game more or less, but with more variation, since it'd be much larger (more units placed basically). I know I said earlier that I dig combat move first for the overall play pace, but when the map is also new and other aspects of gameplay, an intital starting unit set up round could be cool. Sorta like being a kid an opening the box for the first time, where you can oggle the units right at the start, and try to come up with a basic warplan through that first purchase while getting grounded.
Anyhow, just another random thought kicking around. Once you actually see the game open, tooling around with everything seems so much more epic! However it ends up cooking. This one will be rad, for sure! I can tell
Aces!
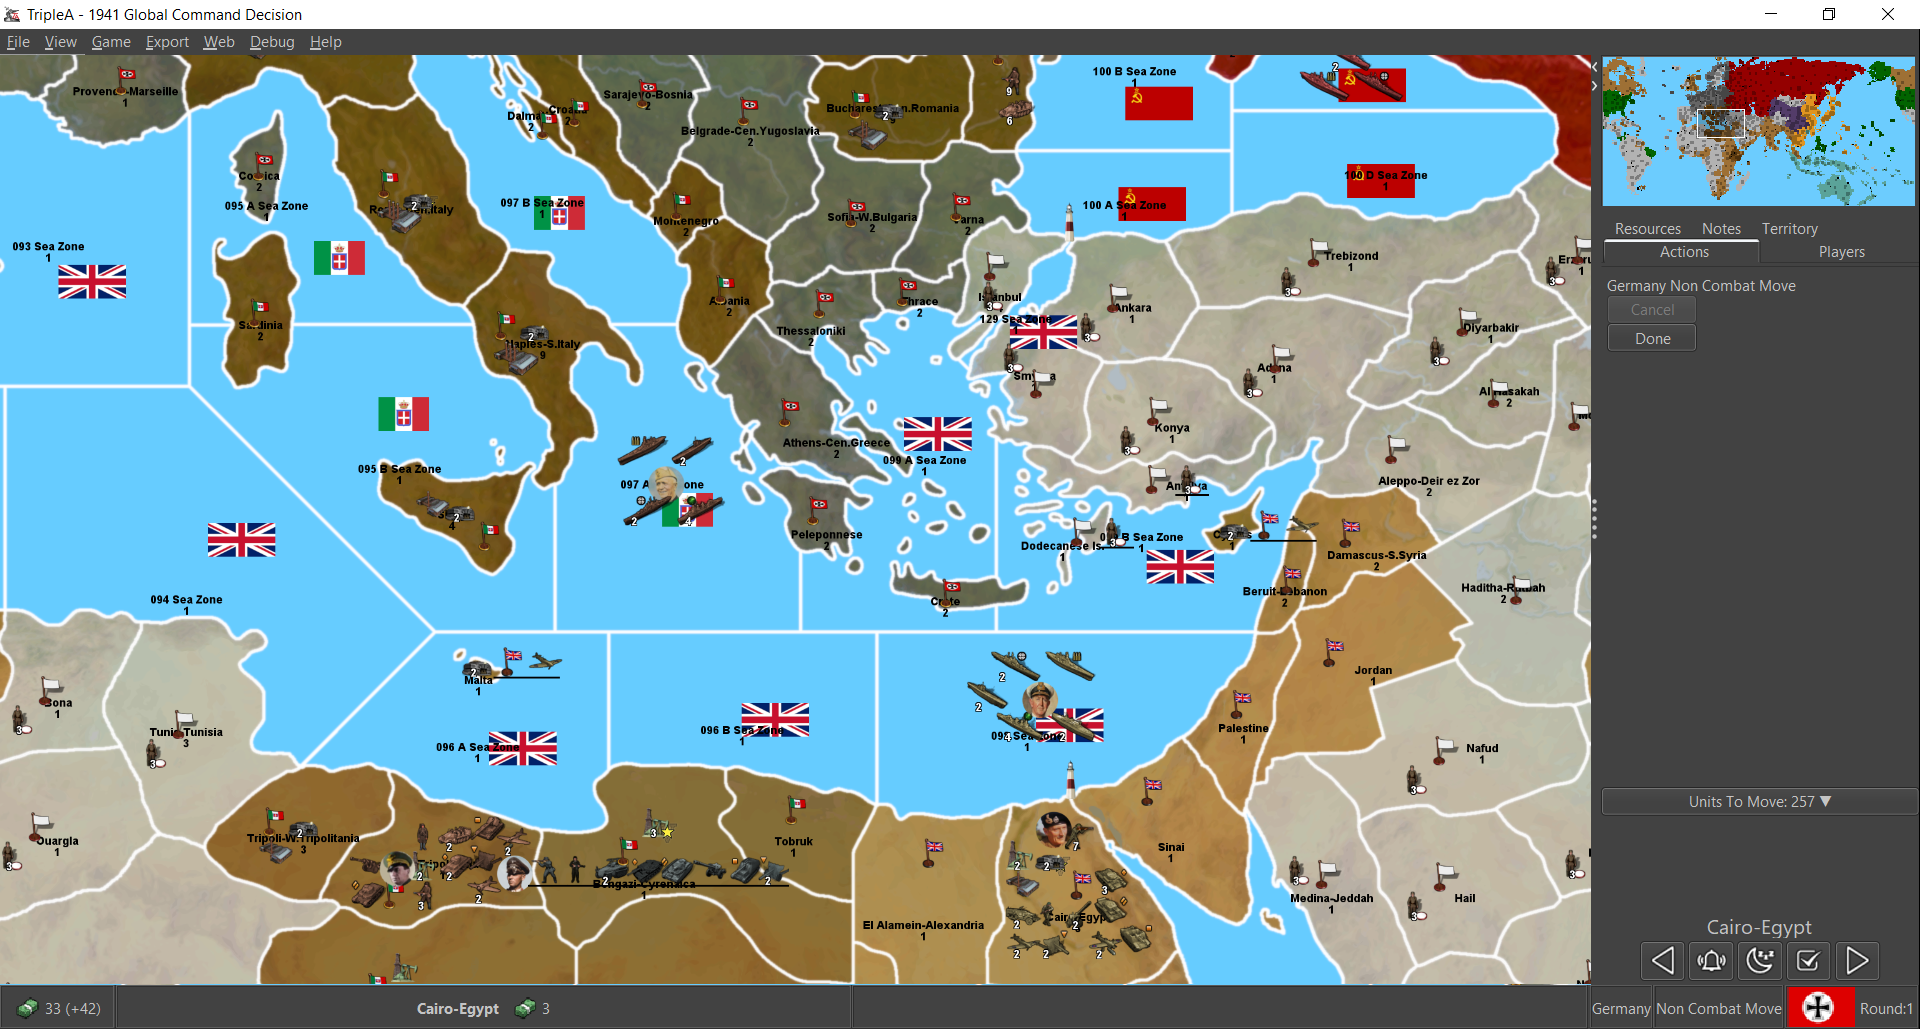
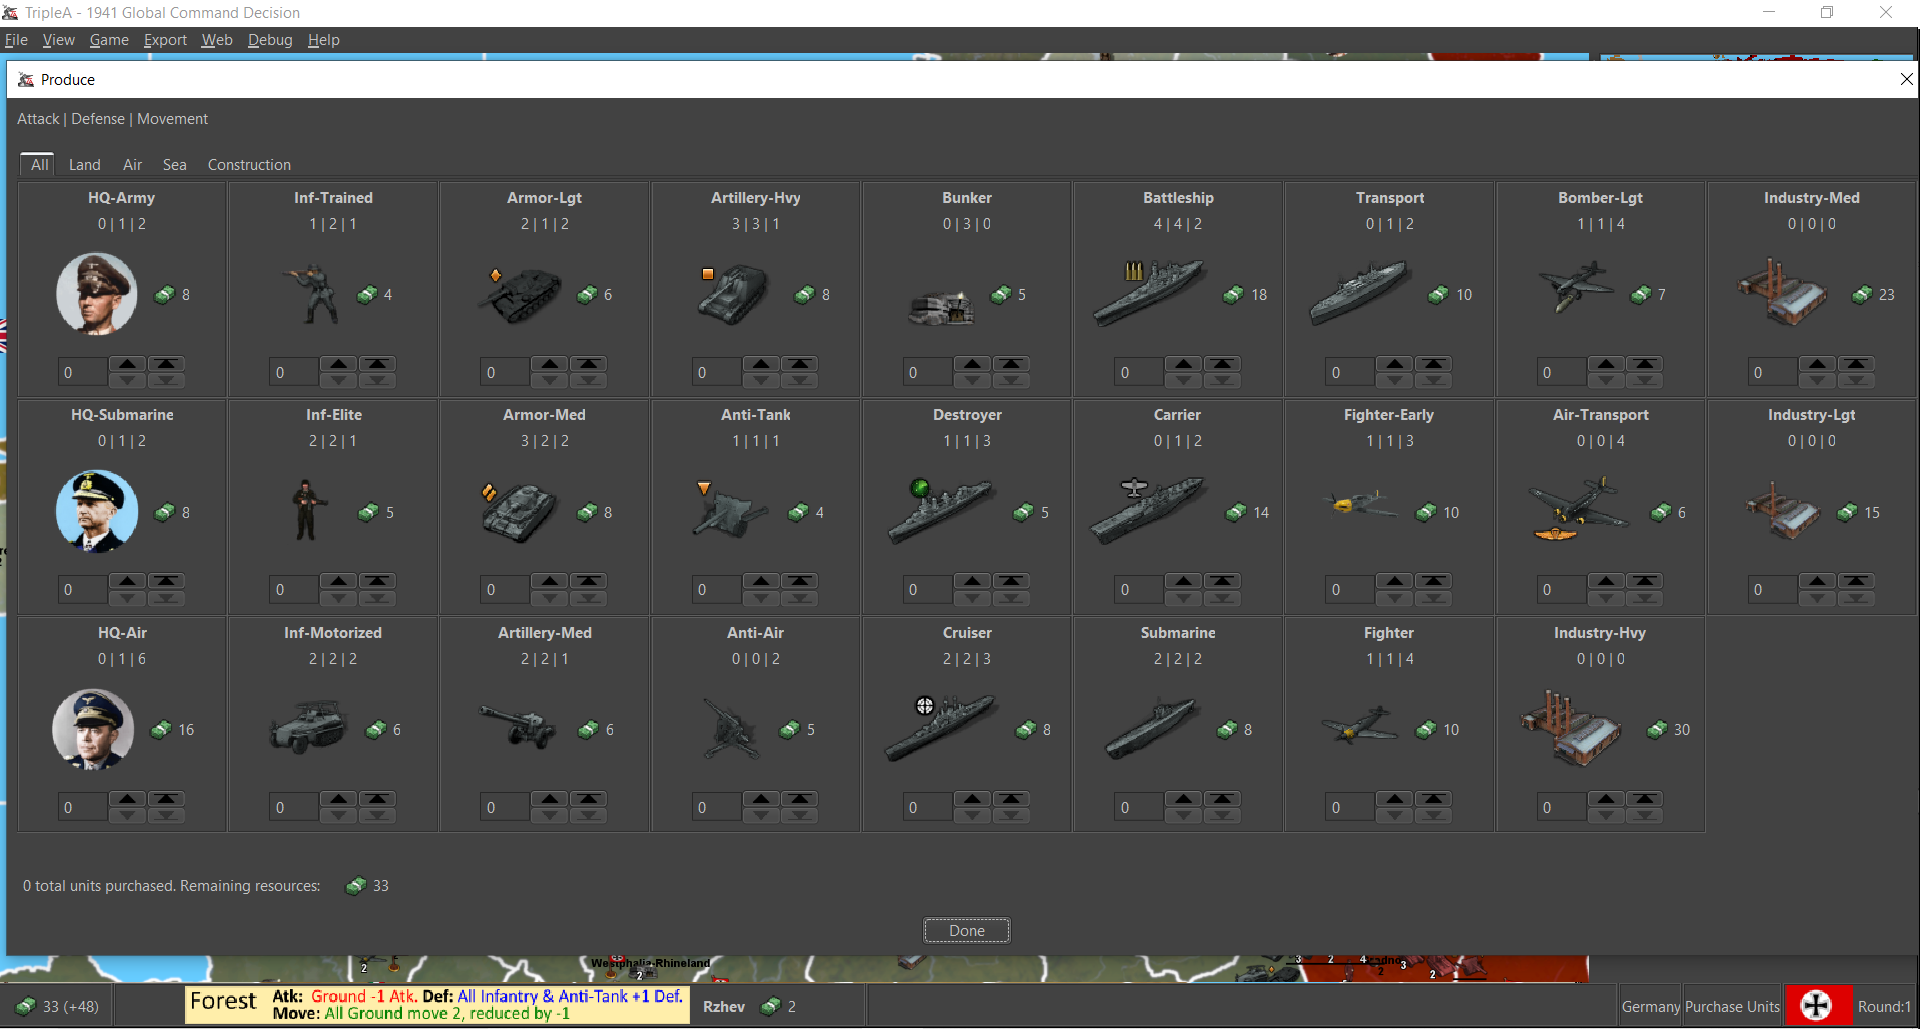
pps. Oh also, for the Command icons, I think I should maybe try a transparency blend around the circumference of the circles for the little portrait icons. Instead of a border which didn't quite hold, maybe just doing a really tight opacity blend? Something to soften the edge slightly in the purchase screen display. For some reason I think tripleA does the upscaling for unit images differently in the purchase screen menu than it handles the same images on the general map display. Units never look as clean there for some reason, or in the unit help menu for some reason, though not really sure why. Seems like these would be the places for tripleA to do 1:1 for the graphics, if anywhere. I see the same phenomenon in pretty much all the tripleA games though, so not really sure how it works where the graphics.
Here's a really tight detail on the purchase window so you can see what I mean.
Here I have the unit display on the map set at 100% (so there's some overlap), but with the purchase window open at the same time for the side by side you get the gist. If you look at Rommel's little circular portrait, or the battleship on the map and compare to the purchase screen you can see it's got that pixilation or visual judder that makes it appear more choppy, like there's no blur, when the unit graphics are the separate window.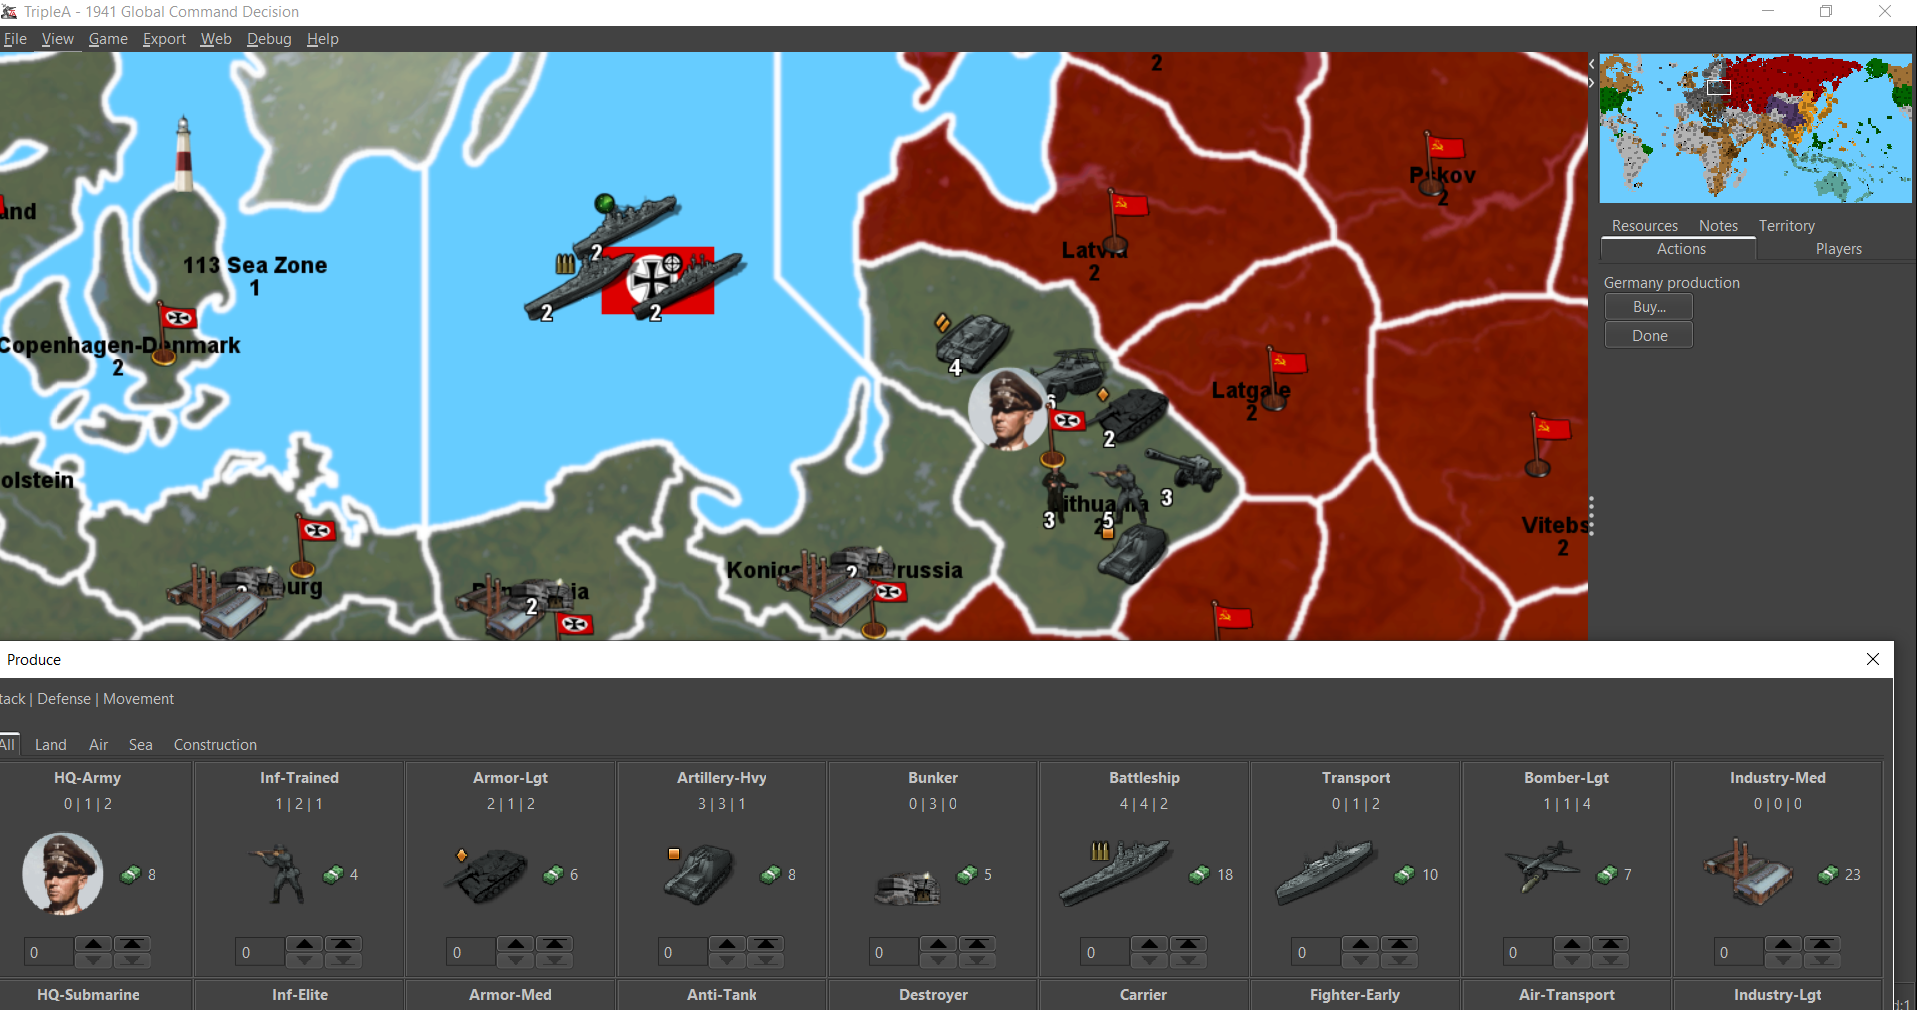
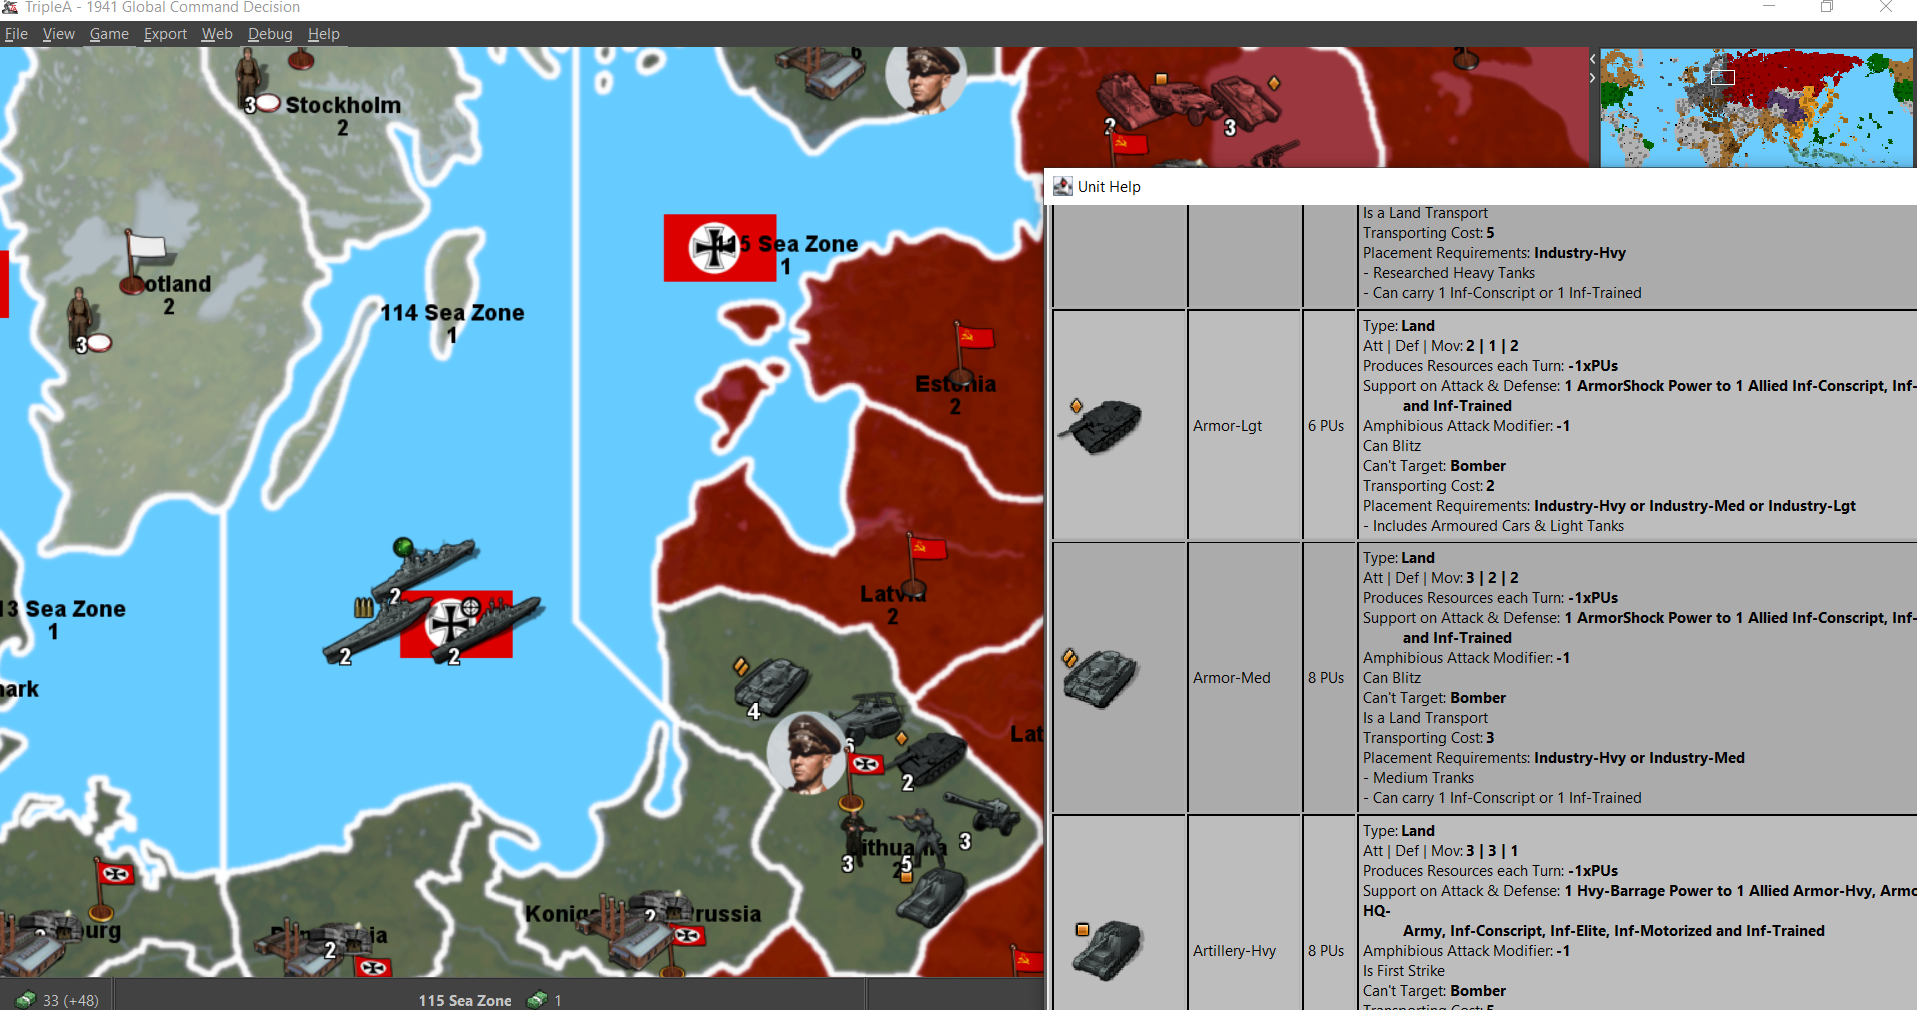
In the Unit help window the effect is more pronounced, with the image appearing extra compressed and pixel-y. You can tell at a glance just comparing the image quality of the Tanks from the map view to the unit help view. Not really sure why though. I think this same thing happens for all tripleA games right? Bizarre
-
@black_elk
Thanks for the first impression feedback, very insightful.I dont play A&A much, as can be seen from my TripleA map making, this is my first WW2 map, maybe a bit too ambitious, but with help ...
So this map does not do the conventional A&A style of play, this is good and bad, so I will let others judge.
The Game Notes font is Calibri 10 and is intended to be just that Game Notes, it is in Word, see here
C:\Users\%username%\triplea\downloadedMaps\1941_global_command_decision\map\doc\images\OrginalsThis is copied into paint and saved as a png and saved here for TripleA to display;
C:\Users\%username%\triplea\downloadedMaps\1941_global_command_decision\map\doc\imagesSo change for your benefit.
The manual proper can be a pdf and maybe you or a volunteer could produce it.

.
Uboat Notifications
Perhaps its best to set the following,
Game> User Notification

This will show where the Uboats have manged to escape to in the Atlantic..
The turns sequence is;
Resources (PU from previous turn), Combat Moves, Non-Combat Moves, Repair Ships/Industries, Purchases then Placements.
This is not what TripleA ww2 players are used to, it favours the AI and to some degree the players who purchase units, then place what they have just bought and saves time and the grey cells.Starting with a board that's more blank, with the player building out their positions, may help the player to feel less overwhelmed by the sheer number of units in play or to navigate the many territories and sz tiles on display.
Yes its a trade off. Im hoping that after the initial shock of the size of it all the players will settle in to the game play.
.
A big change in play style is the use of TripleA AA mechanic not only for ground AA, but also for Fighters shooting other aircraft down and Anti-Tank guns firing at armour.
It is a shame that the TripleA Unit Help panel does not display the unit types the effect is against. But see the actual unit tool tip with text beginning with a "-" like - Good v Armor & Motorized InfantryA Fighter 1/1/4 has two attacks,
1st one using the TripleA AA, so 2in6 verse other Air units and
2nd Attack 1in6 verses anything else like ground units.The Anti Tank gun is similar 1/1/1 has two attacks
1st one using the TripleA AA, so 2in6 in Defence and 1in6 in Attack verses Armour & Motorized Infantry and
2nd Attack 1in6 verses anything else like ground units.I will read your ps & pps later.
-
Right Arm ! Map is Freakin Huge !!! LOL Cool AF
-
Right on! This is invariably the part were I get hella excited, but also immediately start thinking on ways to iterate lol.
I fired up another game, well two actually, but I wrapped the first one after just a couple rounds. Initially I elected to do Germany solo and just kinda spec the AI moves and mess about. But the gameround definitely takes a few minutes to resolve that way. I've played a lot with the fastAI cause it's kinda wild and reckless and fun like that, but the hardAI feels more consistent and the more likely for players I'd guess. Doing that, vs the hardAI, it was definitely more satisfying to take over the entire team rather than just G, with more chances up to bat. I haven't tried the Allies yet, but for Axis it felt pretty good in the turn order without too much downtime.
My Germany opener wasn't very creative lol. My opening move was basically to fly most of the Airforce to the West to cover the British and send all the other ground hitpoints east hehe. My buy was just to stack infantry for successive rounds and play the same way I'd usually play with Germany in A&A for a first outing on a new board. Just trying to spam cheap inf and use what's given for the heavy hitters hehe. Next time I'll try to push to the finish line and grab a save, since I think I almost got the hang of it.
For the distribution of starting forces, I'm still too green to have much of an opinion yet. I can see two basic approaches though. The first is to sort of set the baseline for the entire game with a large number of starting units and a relatively small starting purse, so basically low unit replacement throughout. You know, where the units on the board at the start dictate the overall playpattern, much more than the purchasing. So kinda buying to reinforce the playpatterns recommended by the starting unit set up for a given faction. I'd consider that sort of the standard A&A approach, since all the world war II versions adopt a pretty similar frame and the games all kinda work that way.
The second approach is to do almost the exact inverse of that, where you'd have relatively few starting units, but a much larger purse at the outset. High unit replacement basically, where purchasing is the more important dynamic by far. This is something I've only really been able to explore with house rules in an A&A context, but I like how it sort of flips the opener dynamic on its head and puts the ball in the players court. Since they get more of a choice in what they'll have to work with from the get go.
For a scenario geared that way I think a zero round can be a cool solution. Just to clarify what I mean, that'd be a special initial game round with only a couple phases, like purchase/non com/placement but sans combat. So sort of like a limited mobilization round or a bid round, but one where all sides/players get a move in quick succession. A half-round or partial round more or less, where stuff shapes up but doesn't quite ship out just yet lol. Basically to set the lines and production fronts and catch a quick primer on the units by going through the purchase/place motions.
The upside there is that the player is more involved in process of building out the forces at the game's start, so it's a bit of a hook that way (always fun to buy a bunch of stuff at the outset lol). Downside is that the game is rather less predictable that way, and so less like a puzzle to crack. Usually in A&A I think there is one optimal opener per board, like one best opening play that the unit set up recommends, with all the other openers playing second fiddle to that one, and it's just a matter of players puzzling it out. That's the usual. But a large bid up front or built-in variation to the unit set-up by the player sort of pushes that out. Kicks the can on the balance question a bit, but just making it harder to crystal ball that stuff in advance. Harder to pin down the best opening move, if that move is preceded by randomizers like some of the starting forces in different positions from game to game, which I think has some merit. Even though that's not typically how A&A works, it's sorta what's missing from those games in my view haha.
I think for this kind of game where there's a bunch of new stuff going on already anyway, you can maybe do a bit of both and try to split the different, perhaps find a happy medium somewhere between the predetermined unit set-up like the boxed type games have, and a more free form bid style version of that layers on top of the starter. Then again it's always hard to know how much of the door to leave open with the players dictating the setup I guess, or like trying to guess what the AI can handle for that before it snafus heheh. One reason why I like a zero round purchase type concept as a randomizer, is that the alternative pre-set always tends to hinge on questions of "balance" or the perception of balance by sides, whereas a bid round with a large bid sort of takes that off the table in PvP, since each playthrough would necessarily have more variation by the time you got to the opening combats.
Anyhow just some more random thoughts from the first outing. Fun stuff!
ps. Started a new game and I think I found a connection break in sz 104....
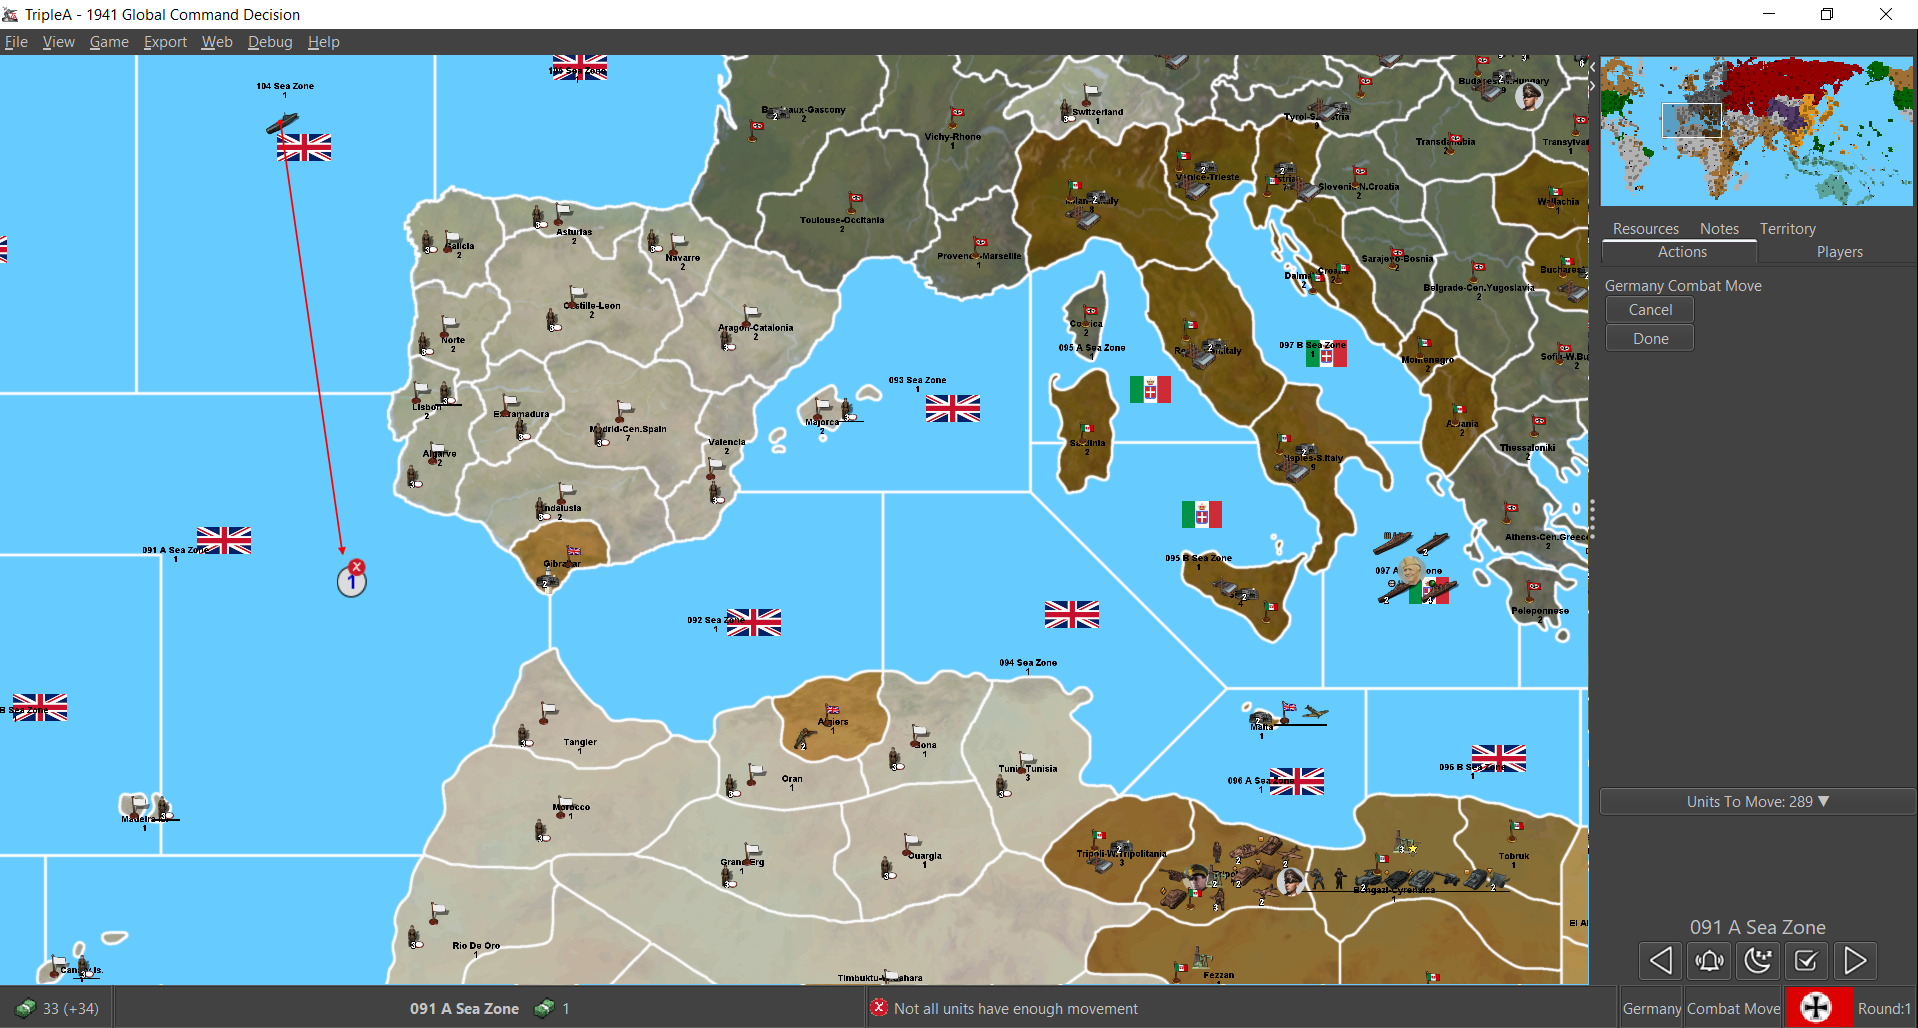
At first I thought it was the sub cap cause I had gone vs the transports, but noticed it when I tried to move on the med. You said 4 subs to a pack right? Anyhow I think I missed him the first time just thinking I was maxed and so went for a random convoy by England. But I wasn't able to bring him into the fight on G1 med push this time, so it might be a connection thing.
Ah never mind, I forgot about the command thing lol. I think that's what was throwing me.
Anyhow, as an aside, the effect of the sub cap on my play was that I was pretty leery of running an attack against the British transports without the clear numbers advantage in my muddle math. It's so scripted into my A&A brain that I think I'd have to run that attack though, like every time right lol. Even going 4 v 4 even match and likely losing the subs in the aftermath, if that's what it takes to sink a British transport that's prob what I'd still do hehe. I think it's like hardwired into the G openers in so many games that it'd become the default calculus. Like "how to screw the royal naval" with whatever can reach hehe. Old habits, but I'd expect to see people default to that. There's always like the holy grail of a German naval game that doesn't involve just getting merc'd instantly, but I still couldn't bring myself to sport ships out the gate. Maybe a few more at the outset would inspire me to get dangerous on the water, but I kept it sorta ground focused like the norm.
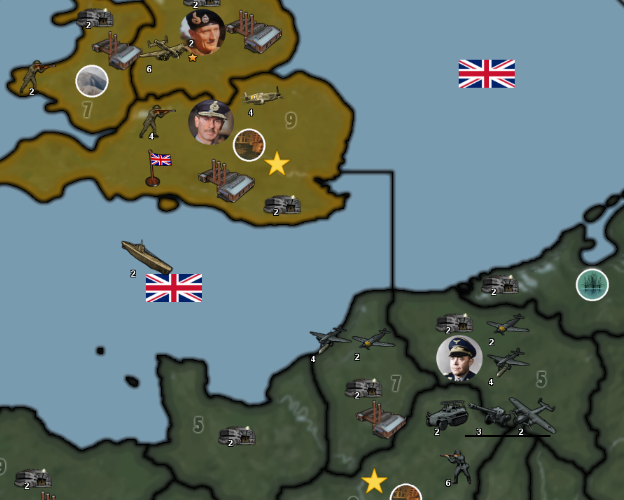
Well anyhow, since the image above also shows N. Africa, one other thought I had was that the G Africa units might be kinda easy to miss. Perhaps a German naval presence in the Med with a flag there would help highlight them?
I also thought having a German controlled sea zone in the Atlantic might help prevent the new player missing their units there on the glance. Like to show a G flag there from the outset as a way to spotlight the Atlantic uboats. The banners change when you move the subs out and about to control, but I mean for that first glance view, just so it's easy for the player to spot that there are German units there from the start.
Another option which could also work in tandem for the Med thing, would be to position some German Africa units in Algeria. Since was like Metropolitan France at the time and France is under German control at the start, it'd make sense to me to just give them a force in Algeria as like their Afrika base of ops hehe. For the flag and the TT colors. Or maybe to have some of the starting G units in Southern France or Greece or Crete to ferry over to the N. Africa campaign on G1? Might be gamey, but I think it'd be easier for the quick read and nudging the player to spot them there. Esp if the adjacent coastal sz had a G banner and a few ships to catch the eye, compared to co-locating with the Italians initially, where they might get kinda lost in the overall view.
Oh and one last thing I noticed, not gameplay related, but I need to fix up the relief for that W. Texas area by the edge wrap. I must have forgot to correct the lines after fixing in it in the base, so the white border still shows that wonky split like the older base. When I get a couple hours free to tool about, I'll try to get that dialed again so it still follows the same visual whether or not the details are on/off haha.
Right then, off for the moment. I'm sure I'll dive back in later on tonight. Catch ya next round!
-
@black_elk
Your ps. re tutorialize
That will be way in the future for me to do, when more people contribute their opinions and I can see the map gaining more favour/traction.I know that their are a lot of viewers/views on their thread, way more than probably all my maps so far combined, so thats impressive.

I wonder if it will continue?
-
pps. Command icons, I think I should maybe try a transparency blend around the circumference of the circles for the little portrait icons.
Yes, do what you think is right, we can always put it back/change it again.
Yes bizarre, now that you point out the look of the same image across the map, purchase panel, unit help panels. One for the Devs, but it low on their list

-
@Black_Elk
Yes, a turn 0 could be the way to randomise the start moves. I like random starts.As an aside for those you like to purchase units
The USA starts with a small military force and therefore has more PU to buy new units, remember that each unit costs 1 pu per turn to upkeep/maintain.
Germany starts with 221-188 units leaving 33pu for purchasing
USA starts with 202+18 (factories produce more pu than the units deduct) leaving 220pu for purchasing.As a player the USA has the option to expand their economy, they have territories that can have Industry-Med built on them that generate even more PU. So what do they do economy or units or both from the get go?
-
Yeah I don't think I ever got to the USA's turn when I was doing the all-human solitaire, but I did notice the maintenance once I hit the second round in the game as Axis vs the HardAI.
The effect is interesting, since it creates a bit of haziness around the unit replacement stakes round to round. Basically trying to anticipate how many hitpoints or fodder units are likely to die in the near term, so you don't just blow the wad and hit the maintenance ceiling prematurely. It creates an incentive for conquest and maybe even more of an incentive for attrition of your own forces, like if you're near that limit where the maintenance and income are going to hit parity. To me this might favor Low Luck, since there the attrition rate can be more predictable, and you can peg your losses based on the pips as the attacker. But then I'm a diceman at heart, and so don't really dig LL all that much outside of playbalancing openers. An LL theme there wouldn't quite do it for me hehe. I'm more of a masochist and enjoy the crushing variability of diceplay for sure. The tricky part though, is that it's still sort of a guessing game for me there with the maintenance, until I've played as the opposing faction as well. This is similar to regular A&A play, in the sense that I wouldn't exactly know what to do on G1 in v3, till I saw some R1 counters, and how the stacks measure up after the purchases and bonuses or whatever are factored in. Sort of the old A&A dilemma of going in a bit blind, before you can see what's happening and learn how to play well in response, just to get a sense of how the playpattern unfolds out the opener. I'm not quite there yet, but it's fun anytime it's something new like this.
Glad you were feeling the round zero idea. I've only ever tried it in AA50, and pretty measured there in the totals. Like I think the highest I ever tried for a universal bid was like 20-30 PUs to everyone, but at the income scale of AA50 and with the unit start they had there, that was definitely enough to entirely change the state of the board on G1 and reset the play out of the first round pretty much completely. The way I did in FtF play was basically the secret purchase type method (behind the screen basically), where each player-nation would do the purchase phase simultaneously write down their placement location, then everyone would reveal at the same time. This was done to prevent the tit for tat placement, and to create an element of surprise and tension. Keep the players sweating over whether be conservative and safe and defensive, or do something more audacious and higher risk and aggressive. This was on top of the standard unit set up mind, so not like the whole entire starting forces revamped, but enough new hitpoints in the mix to keep it spicy.
People seemed to enjoy the vibe and the element of unpredictability, but then my friends were pretty HR friendly and willing to indulge me lol. The prob with trying to replicate something similar in tripleA, is that here everything is structured by the sequential game round and information is saved in the game history, so it's harder to create that "behind the screen" or hidden ballot buy situation. One thought I had was to maybe just split the phase up. So maybe everyone does the purchase, and you can see what people bought, but don't know where it will be placed. So you get that arms race effect. This privilege's the player-nations at the end of the turn order sequence, since they'd have more info to go on when their turn to purchase/place came up. When I tried this concept for a variable start AA50 game (where the nation that started the game would change position based on a first roll) my solution to that kink was to give a larger pile of cash to the nations that went earlier in the sequence, and a smaller pile to the player-nations that went at the end of the sequence, rationalizing it that the player who goes last can make the most focused buy with more information going into it, since they can see what everyone else placed. Not sure if something like that would fly here, but I always enjoyed the idea haha.
Sounds good! Now that we got a kickass templet and I can trial the unit images inside the actual game, should be easier to make stuff look as clean as possible.
I definitely think that would be a top thing to fix in the graphics department, to make sure that the units in the purchase/help screen look sharp. I'm surprised I didn't notice it really before. I mean I think I may have noticed, but it didn't jump out till I sat with the screen up for a while.
I don't think the images are different between the Purchase and Unit help screen, but the fact that the Unit Help appears against the lighter colored background, makes the pixilation more noticeable than when it's over the darker gray of the purchase window.
Perhaps there's a way to tweak the display for unit help to be darker as a stopgap? If they looked like the Purchase unis or the Battle Calc (which has the same going on) set against the grey, Unit Help would look better, but it's definitely doing something to the images there. Maybe cause it has to open em in a separate window and that's where the compression enters in? No clue honestly, but it'd be cool if we could get em to look the way they do on the map somehow.
That'd be a plus for sure, if it's happening across all the maps, since the purchase screen is like one of the main ways the player interacts with units, it'd be nice to have those be among the largest/cleanest/best in show version hehehe. I don't know, but maybe a dev will take it up, since it's pretty front and center for the overall visual appeal.
-
For the G1 tactic, with the set up as is, I thought the most reliable seemed like all-in sz 109 with the air from Picardy, to try to smoke that Brit pocket fleet with as few losses as possible, and force the main Brit fleet back to mop up with their DDs or tie down with the subs the survive. I think I got in with 14 unit remaining when I sent all the subs, but that was maybe way overkill haha. So just sort of winging it with the remaining sub spawns in that one. I got 3 I extra I think in the first drop. Tricky part there is that visually they look the same as the starting uboats till you click and try to move em. So if like me, you're not quite paying attention at first, and aren't quite familiar yet with main sub spots from the standard setup, it might be cool to have a special graphic for those maybe. Not sure if it'd work, but maybe a glow halo or something for that?
Anyhow that was my first run attempt, to just bang into sz 109 like a champ. I thought about breaking off one of the Naval commands, or doing a fan out to force an allied spread, but seemed like smoking the transports was more important. Cause managing 2 transports on UK1 counter felt manageable, but 4 seemed bad for business hehe. I did 1 destroyer from the baltic fleet to sz 110 B just to make me feel safer, since I knew the air in 109 would have to land back on the coast but it was probably unnecessary.
On the Eastern front I wasn't quite sure if I should press north or south, but decided North might be safer just to deadzone the spots immediately adjacent to the front line factories. I figured for the middle that a strafe and jet might work, so as not to screw the Italians over too hard, and hold the Russians there in stasis, while trying to inch up towards Leningrad, which old habits seemed to recommend lol.
For N. Africa I just advanced towards El Alamein, since it seemed like the only real play down there. Going all in felt like danger, so kinda rambled in waiting for the Italians. Maybe Rommel would have been bolder, but I chickened out lol. I think if it was a bit of a choice between racing toward Egypt or securing Tunisia/Algeria for production, it might have been a bit of a tossup to go west or east, but I couldn't reach Tunisia so just went creeping east. I'll probably have to do it like 20 times or more, before I get my bearings haha
-
@black_elk
Check this out
Game> Engine Settings
UI Theme tab
Change Look and feel to Substance Mist Silver (my PCs setting)Then observe the UI especially the Purchase panel, then do your own thing and find the Look and feel that works for you.
.
N. Africa options
For N. Africa the Germans on G1 could invade Tunisia and the following turn build a Industry-Lgt? (I know chronologically a bit early.)
Think of this German Industry as building up a massive supply depot, by air and sea without the player having to keep moving the air and sea unit transports to achieve it. -
My power went down earlier so I couldn't get online, but I played G openers till the laptop battery ran down heheh.
The map is pretty fun! The only thing I wasn't really feeling was the cap on battle rounds. I think it's 3 on land, 2 at sea, 1 in the air right? I can get into most of the other changes, but that one was maybe a bridge too far for my brain lol. Coming out of A&A, combat round limits are I guess the hardest thing to get my head around, especially for the naval combats, as I'm just so used to the attacker being able to press the attack at their discretion until they win, die, or elect to withdraw lol. I understand the mechanic at play, but it's so different, that it felt like the rug kept getting pulled out from under me right before the fireworks went off hehe. I found that it also made it pretty hard for me to parse the likely outcomes with the battle calc, like for anything on the margins, so I didn't really use it. The effect on the play I think, was to make me not want to run any battle that I couldn't sweep outright, with overwhelming force. So basically no 50/50 gambles or gambits. Or at least not at sea, for sure. But I had the same impression on the Eastern Front with the ground game. Like if I couldn't crack it in the opening salvo with overwhelming booms, it seemed better not to tempt fate. Maybe I'm too cautious though. I kinda miss dragging things out or getting dicey with the nail biters, but the battle round thing kept giving me pause and second guessing.
Anyhow, last rando thought for the night. Gotta save the juice in case the power goes down again! I'll check those UI spec though for sure!
Catch ya next round
Hello! It looks like you're interested in this conversation, but you don't have an account yet.
Getting fed up of having to scroll through the same posts each visit? When you register for an account, you'll always come back to exactly where you were before, and choose to be notified of new replies (either via email, or push notification). You'll also be able to save bookmarks and upvote posts to show your appreciation to other community members.
With your input, this post could be even better 💗
Register Login